Attacking WIFI

Attacking WIFI
Attacking WIFI
For more organized version visit => “https://arrow-lightning-608.notion.site/WIFI-1ada2e6a481e80e4938ec876b157167f”
resources
- mahara tech wireless pentesting course
- hack the box academy wi-fi module
- https://youtu.be/f2BjFilLDqQ?si=_6q7rcJeFL_hF0oH
- check this → network basic for hackers by occupy the web
Practicing
- https://r4ulcl.com/posts/walkthrough-wifichallenge-lab-2.0/
Important knowledge
Network Example
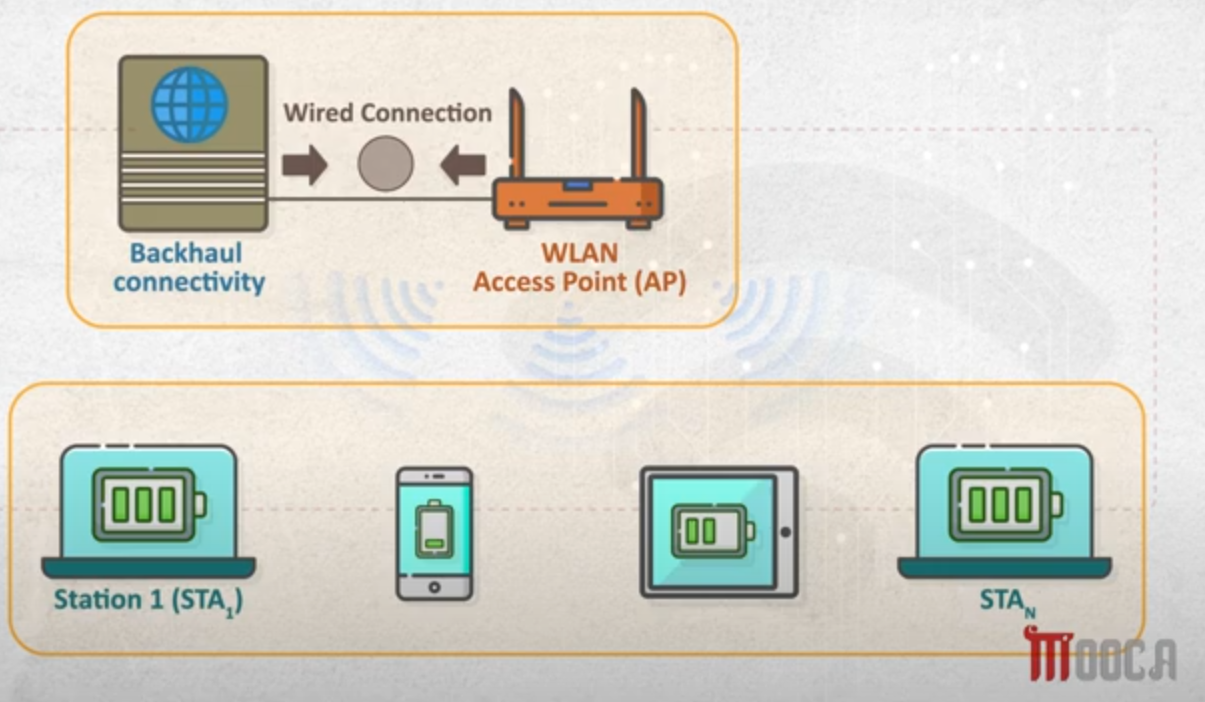
- Access point
- it’s a device uses the wireless infrastructure network mode to provide a connection point between WLANs and a wired Ethernet LAN.
- it working in Access point mode (it’s mode of wifi protocol modes) that provides network access for clients(devices).
- Types of Access points
- SOHO: small office /home office → simple to use , easy configuration , WPA/WPA2 working with PSK (preshared key for security)
- Enterprise : Scalable solution , has RADIUS authentication server , advanced features link layer filtering ,and security features, ids , ips……
- military: use
802.11but modified , and they use their own frequencies not 2.4 & 5 GHZ
- Access Points Modes:
local APin this mode the access point is that we are connected to like home router.managed(client mode) here i am connected to access point and i will talk through it. (wifi adapter)monitorhere i will be passive i won’t connect to any one but i will record all traffic.- how? in another modes ,at first the access point check the mac address of the received message if it’s not it’s mac address it ignores the message , but in the monitor mode it record and listen to all even if the message doesn’t have it’s mac address.
ad-hocmode Essentially this mode is peer to peer and allows wireless interfaces to communicate directly to one another. This mode is commonly found in most residential mesh systems for their backhaul bands. That is their band that is utilized for AP-to-AP communications and range extension , it works as and extendermasterit’s the mode of the routers and access points

- Client - Station
- it’s the devices communicating with the AP in client mode(mode of wifi modes) to get internet/network access through wifi.
- SSID - Beacon
- service set identifier.
- Beacon
- It’s the network name that we want to connect to.
- the client identifies network through SSID.
- BSSID
- basic service set identifier.
- it’s the MAC address of that access point that we want to connect to.
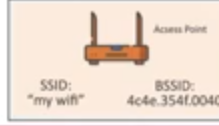
- BSS
- basic service set.
- It’s an architecture in it there is access point and one or more wireless client connecting to it.

- ESS
- Extended service set.
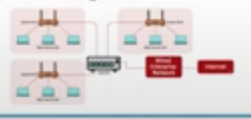
- here there is more BSS connected to each other.
- they use multiple Access Points.

- according the above , if i went from the reception hall to the office roam , i will still be connected to the network , as they are connected through switch and use the same ESSID but the access point i am connected to will change.
- the phone will identify network through ESSID not BSSID
- Wireless Radio Channels
- in wifi we have 2 radio channels ,
2.4GHZ , 5GHZ - in
2.4GHZwe have 14 channels. - in
5GHZwe have 8 channels. Image

802.11n→2.4GHZ- the channel band width is
20MHZ or 40MHZ
- the channel band width is
802.11ac→5GHZ- the channel band width is
80MHZ or 160MHZ
- the channel band width is
- in wifi we have 2 radio channels ,
WIFI security standards & protocols
image

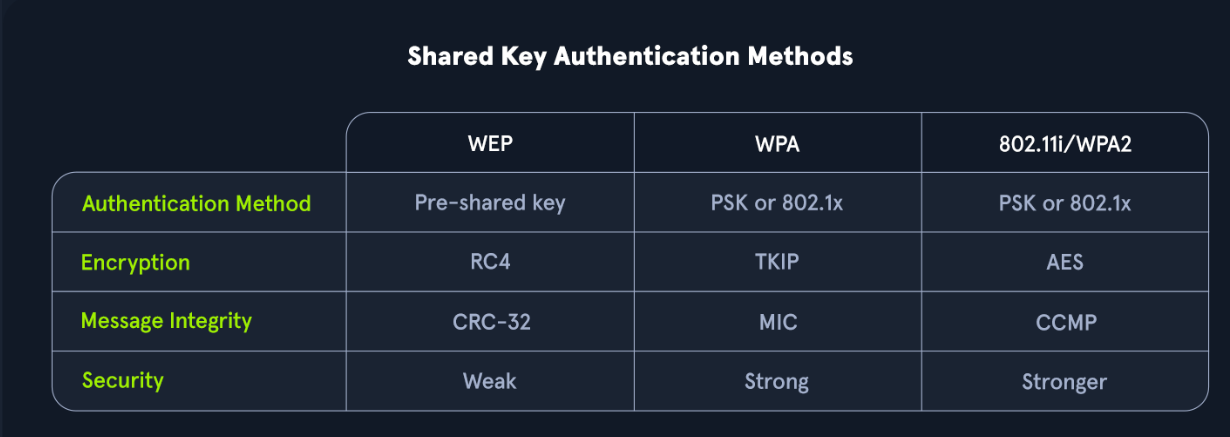
- WEP
- it’s too weak.
- it can be cracked easily
- it uses CRC
- How encryption works?
initialization vector (IV)is an arbitrary number that can be used with a secret key for data encryption , it’s also known asnonce, is employed only one time in any session to prevent unauthorized decryption of the message by a suspicious or malicious actor.- with the shared secret key , it will generate the
RC4
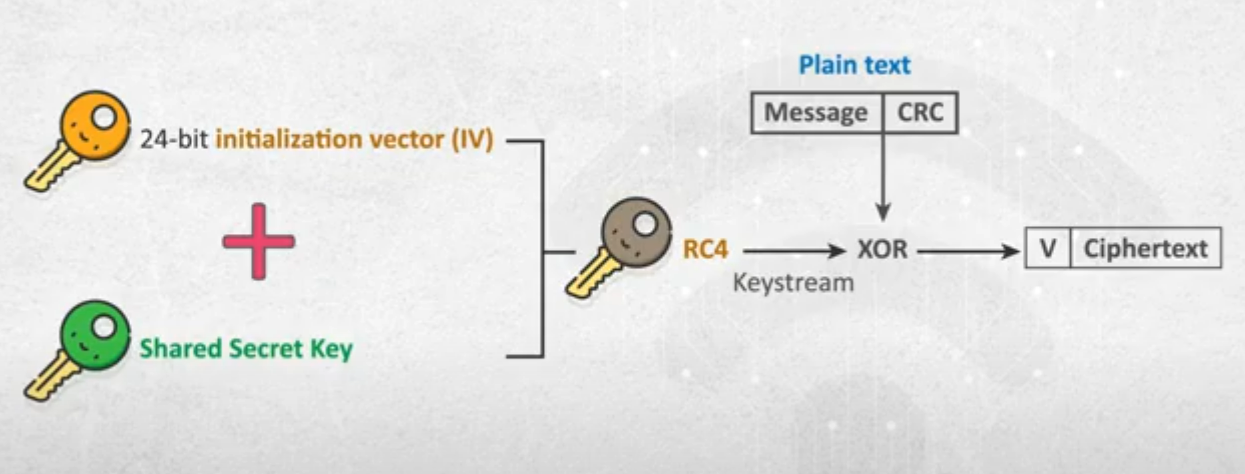
- note: as you may notice each generated packets has it’s own
IV
802.11x- Extensible authentication protocol.
- it’s the authentication protocol of wired lan and wireless lan.
- it supports different methods of authentication like (OTP , kerberos , certificates ….)
802.11iWPA- wpa is still weak as it didn’t fully implement
802.11i - it can be easily hacked
- note: the new devices with new protocols supports old protocols.
- it uses TKIP : temporal key integrity protocol.
- it ensures message integrity , it’s like error detection .
- to make the this work with old versions , they took some implementation from WEP so that’s what made the protocol insecure.
- it uses key with length ⇒
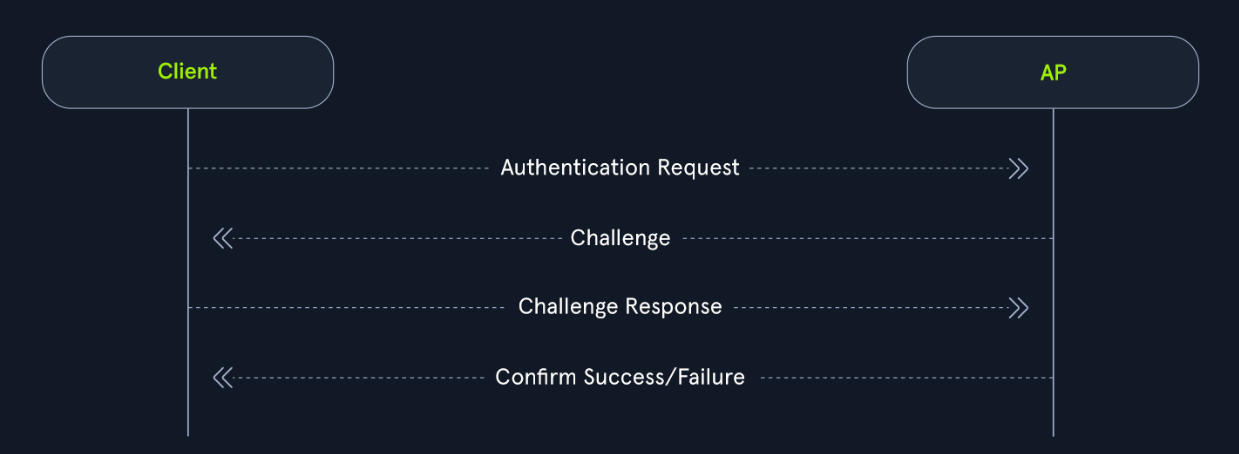
64bit ~ 128bit - authentication
Authentication Request:The client sends an authentication request to the AP to initiate the authentication process.Authentication Response:The AP responds with an authentication response, which indicates that it is ready to proceed with authentication.Pairwise Key Generation:The client and the AP then calculate the PMK from the PSK (password).Four-Way Handshake:The client and access point then undergo each step of the four way handshake, which involves nonce exchange, derivation, among other actions to verify that the client and AP truly know the PSK.
- wpa is still weak as it didn’t fully implement
802.11iWPA2 - RSN- it’s the full implementation of
802.11i - it’s also called RSN : robust security network.
- it makes the process of cracking wifi password a bet harder.
- it uses AES encryption , so it’s more secure.
- authentication modes
- PSK (personal mode) : pre shared key , like in home we have one password to connect to the home router , here we use (passphrase - pre shared key)
- Enterprise mode : as there is RADIUS server , each user has it’s own password , as this server is responsible for authentication , here we use (exchange/configuration key , negotiation key)
- it’s the full implementation of
802.11wWPA3- it’s the most advanced .
- WPS
- wifi protected setup
- it’s a feature that enables us to connect to the access point with ssid only without using password by pressing WPS button in the access point .
- process :
- after you press the button on the router , the router enter listening mode for 2 about minutes(it can vary)
- During this time, it will automatically accept connection requests from devices without requiring them to enter the Wi-Fi password
- connect from phone : On your phone, when you go to the Wi-Fi settings and try to connect to the router, your phone will detect that WPS is active. Instead of asking for a password, the phone will connect directly to the router.
- Client Connection & Authentication (preshared key authentication)
- note : the whole process happens unencrypted using open system security.
image
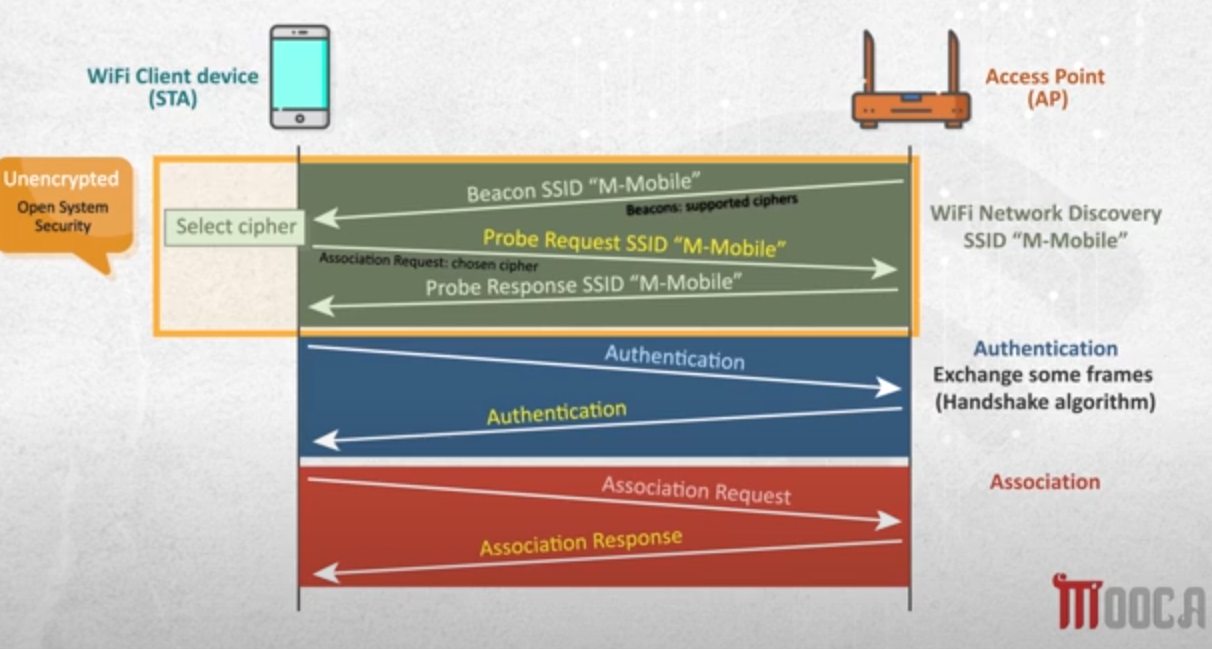
- wifi network discovery
- note :in the image the access point name (
ssid) is M-Mobile, i usedshadooin explanation- access point broadcast Beacon
ssidframe , it says that i am shadoo(access point name) , and the client can connect to it.
- it tells the near clients that there is a network here with the name shadoo
- it sends this frame periodically , and we define that time in access point setup.
- more about
beacon frames- Beacon frames are primarily used by the access point to communicate its presence to the client or station.
- It includes information such as supported ciphers, authentication types, its SSID, and supported data rates among others.
- now i will use my phone to connect to this network , so i will use send
probe request SSID "shadoo"
- now i will use my phone to connect to this network , so i will use send
- here i also send association request with the cipher i want to use like if the access point is supporting more than one security protocol like WPA/WPA2 , i can choose what i want. (here you send the cipher’s type , not cipher)
- more about
probe request- The probe request and response process exist to allow the client to discover nearby access points.
- Simply put, if a network is hidden or not hidden, a client will send a probe request with the SSID of the access point. The access point will then respond with information about itself for the client.
- the access point will reply with
probe response SSID "shadoo"
- the access point will reply with
- access point broadcast Beacon
- note: in the hidden network beacon frame is not sent.
- note :in the image the access point name (
- authentication (four way handshake)
- after receiving the probe response , we will start the authentication process.
- four way handshake
image of process

- Access point send to the client an ANonce , it’s access point nonce (number only used once) , it’s random number generated by random number generator (it’s a hardware component that generates the random numbers , and no one can guess it.)
- after getting the Anonce from the access point , the client has all the parameters to generate a PTK (Pairwise temporary key) and it will send SNonce (station(Supplicant) nonce , it’s also the random number generated by the station) and it will send also MIC (message integrity check , it’s used to encrypted the message from the client)
- then the access point will generate also the same PTK as it has the same random number and verify that they are equal (generated and received PTK) through comparing it with the information received from the client (via the MIC). and it generate GTK (group temporary key ) and send it and send also MIC (message integrity to encrypt the frame sent by the access point. ).
- after receiving the above from access point , it will check the construction of GTK ,and send an ACK to the access point.
- conclusion : the client uses the ssid and the passphrase to generate psk (pre shared key , as it’s with both the client and the access point) , then client uses the psk and the anonce from the access point and the snonce from it to generate the PTK , then send the snonce(as the access point doesn’t have it and it’s required to generate the ptk) to the access point and the MIC (it’s important so the access point can validate the PTK as it’s not sent by the client as it’s security flaw), the access point will generate the ptk and compare it with the information received from the client (via the MIC). If the MIC matches, it confirms that both parties derived the same PTK, and access is granted, (note: if the passphrase entered by client is wrong the generated psk is wrong and so the ptk)
- note MIC: it’s generated through hashing with sha-1
- Handshake Key generation
image of key genertion

- now we use the
ssid(network name)andpassphrasein key generation , so the more they are long and strong the more the cracking is difficult. - PSK/PMK = passphrase(like wifi password) +
SSID(access point name) - to generate the PTK we use (PSK/PMK + Anonce + Snonce)
- now if we have the passphrase and ssid we can generate the PSK (public shared key) , and if we monitored the network and got the anonce and snonce we can generate the PTK.
- Inside the PTK:
KCK: 128-bitkey confirmation key , used to compute MIC.KEK: 128-bitkey encryption key , used by access point to encrypt data. (like data packets)TK: 128-bitTemporary key , used to encrypt and decrypt unicast packetsMIC Tx key: 64-bitused with TKIP configuration for unicast packets sent by the access points.MIC Rx: 64-bitused with TKIP configuration for unicast packets sent by clients
- associations
- after authentication , the client sends an
association requestto the access point to connect to it. - then the access point replies with
association responsethat indicates whether the client is able to associate with it or not. - deassociation
- Disassociation and Deauthentication frames are sent from the access point to the client.
- Similar to their inverse frames (association and authentication), they are designed to terminate the connection between the access point and the client.
- These frames additionally contain what is known as a reason code. This reason code indicates why the client is being disconnected from the access point.
- We utilize crafting these frames for many handshake captures and denial of service based attacks during
wi-fipenetration testing efforts.
- after authentication , the client sends an
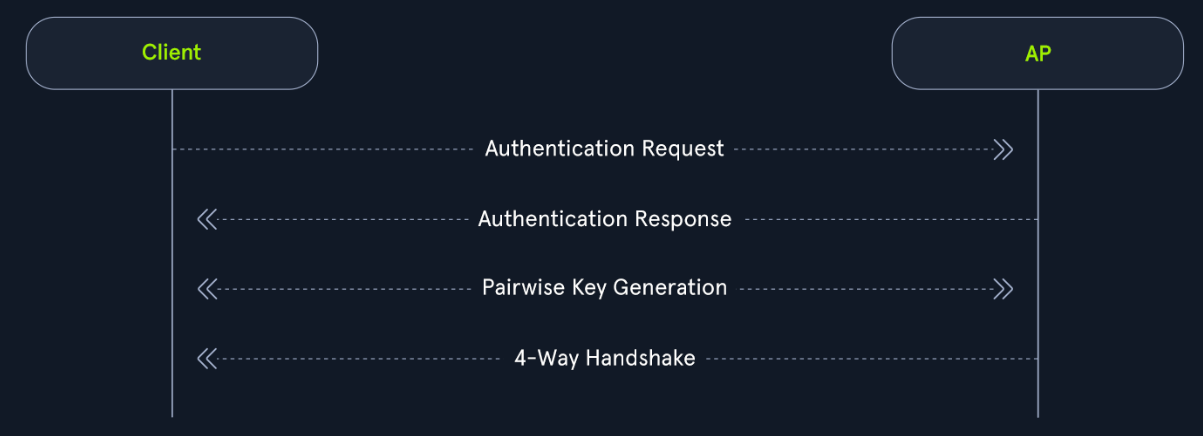
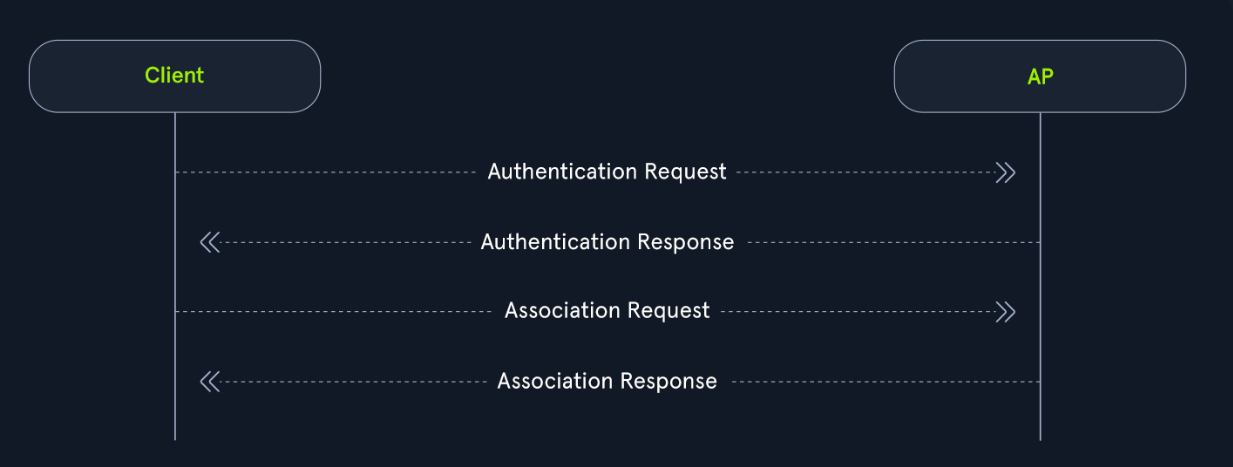
- open system authentication
- about
- straightforward and does not require any shared secret or credentials for initial access.
- This type of authentication is typically used in open networks where no password is needed, allowing any device to connect to the network without prior verification.
- process
- The client (station) sends an
authentication requestto the access point to begin the authentication process. - The access point then sends the client back an
authentication response, which indicates whether the authentication was accepted. - The client then sends the access point an
association request. - The access point then responds with an
association responseto indicate whether the client can stay connected.
- The client (station) sends an
- about
- Frame types
Management (00):These frames are used for management and control, and allowing the access point and client to control the active connection. (control the connection)- sub-type of management frames
Beacon Frames (1000)Probe Request (0100) and Probe Response (0101)Authentication Request and Response (1011)Association/Reassociation Request and Responses (0000, 0001, 0010, 0011)Disassociation/Deauthentication (1010, 1100)
- sub-type of management frames
Control (01):Control frames are used for managing the transmission and reception of data frames within wi-fi networks. We can consider them like a sense of quality control.Data (10):Data frames are used to contain data for transmission.
WIFI Attacks & adapters
- wifi adapter
- list of adapters based on performance
- control modes of wireless adapter
- using
ifconfigandiwconfig- start monitor mode →
iwconfig wlan1 mode monitor- at first →
ifconfig wlan1 down - then →
ifconfig wlan1 up
- at first →
- stop monitor mode →
iwconfig wlan1 mode managed- at first →
ifconfig wlan1 down - then →
ifconfig wlan1 up
- at first →
- to change between modes
1
2
  sudo ifconfig wlan0(network interface) down
  sudo iwconfig wlan0 mode (monitor/managed) mode
- start monitor mode →
airmon-ng- to start monitor mode →
airmon-ng start wlan1 - to stop monitor mode →
airmon-ng stop wlan1 - note: if we had problems →
sudo airmon-ng check kill - to check the process that may interfere the monitor mode
1
  sudo airmon-ng check
- to start monitor mode →
iwsudo iw dev wlan0mon set channel 1start monitor mode
- using
- tx power
- to get our tx power use →
iwconfig

- we can see all of the different txpower settings that we can do for our region.
iw reg getby default it’s set for our country- to change country →
iw reg set USthen use it - note: In many cases, our interface will automatically set its power to the maximum in our region , to change it
1
2
3
  sudo ifconfig wlan0 down
  sudo iwconfig wlan0 txpower 30
  sudo ifconfig wlan0 up
- to get our tx power use →
- channels
- to get channels supported by the interface →
iwlist wlan0 channel - to use specific channel
1
2
3
4
  whiteShadoo@htb[/htb]$ sudo ifconfig wlan0 down
  whiteShadoo@htb[/htb]$ sudo iwconfig wlan0 channel 64
  whiteShadoo@htb[/htb]$ sudo ifconfig wlan0 up
  whiteShadoo@htb[/htb]$ iwlist wlan0 channel
airmon-ng- to set specific channel →
1
  sudo airmon-ng start wlan0 11
- to get channels supported by the interface →
- frequency
- to display the frequency →
iwlist wlan0 frequency - to change the frequency
1
2
3
  whiteShadoo@htb[/htb]$ sudo ifconfig wlan0 down
  whiteShadoo@htb[/htb]$ sudo iwconfig wlan0 freq "5.52G"
  whiteShadoo@htb[/htb]$ sudo ifconfig wlan0 up
- to display the frequency →
- info about adapter capabilities
iw list- to get the chipset and the driver →
sudo airmon-ng
- some wireshark filters
- beacon frames
1
  (wlan.fc.type == 0) && (wlan.fc.type_subtype == 8)
- probe request
1
  (wlan.fc.type == 0) && (wlan.fc.type_subtype == 4)
- probe response
1
  (wlan.fc.type == 0) && (wlan.fc.type_subtype == 5)
- authentication process
1
  (wlan.fc.type == 0) && (wlan.fc.type_subtype == 11)
- association request
1
  (wlan.fc.type == 0) && (wlan.fc.type_subtype == 0)
- association response
1
  (wlan.fc.type == 0) && (wlan.fc.type_subtype == 1)
- eapol handshake
1
eapol- diassociation frames & deauthentication frames
1
  (wlan.fc.type == 0) && (wlan.fc.type_subtype == 12) or (wlan.fc.type_subtype == 10)
- connect to wifi network
- list the wifi networks
1
  sudo iwlist wlan0 s | grep 'Cell\|Quality\|ESSID\|IEEE'
sudo iwconfig wlan0 essid network_name- wep networks
- add this to
file.conf
1
2
3
4
5
6
  network={
  	ssid="HackTheBox-WEP"
      key_mgmt=NONE
      wep_key0=1A2B3C4D5E
      wep_tx_keyidx=0
  }
sudo wpa_supplicant -c wep.conf -i wlan0- then to get ip
1
  sudo dhclient wlan0
- add this to
- wpa supplicant
- add the config file
file.conf
1
2
3
4
  network={
  	ssid="GAMMER-5G"
      psk="minecraft"
  }
sudo wpa_supplicant -c wpa.conf -i wlan0sudo dhclient wlan0 -rto get ip- then
sudo dhclient wlan0
- add the config file
- network scanning attack
- we use this to get info about the access point and network.
- types of scanning
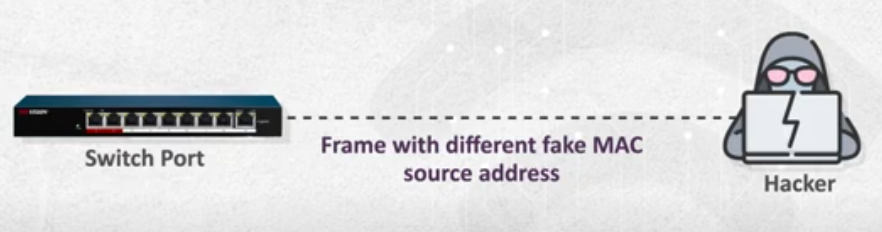
- active network scanning
- here our device must broadcast frame to the surrounding clients to scan the network.
- note : it’s active as our device engage with the target
image

- from here we can get more info than passive scanning but we will be more noticeable.
- passive network scanning
- here our device just listens to the beacons without any engagement .
image

- here no one can detect me.
- active network scanning
- scanning around networks
iwlist wlan0 scan | grep 'Cell\|Quality\|ESSID\|IEEE'- note:if you got
no scan resultsthen wait for 15-30 seconds then try again.
- tools
- wifi monitor tools :
- kismet
- aircrack-NG
- network scan tools :
- netstumbler
- wellen reiter
- wifi monitor tools :
- Sniffing
- airodump
- after scanning
- scanning around networks
- sniffing →
airodump-ng wlan1 (interface) --channel 4(channel) --bssid E2:19:CB:BB:09:A9(mac address) --write test_out(output file) - from that we can get connected devices

station:is the connected device mac address
- wifite
- listen to all traffic →
wifite
- listen to all traffic →
- airodump
- Spoofing
- mac address changing
- note: you need to use it in managed mode not monitor mode
- use
macchanger - down the interface →
ifconfig wlan1 downmacchanger --random wlan1- note : our mac in new mac
macchanger wlan0 -m 3E:48:72:B7:62:2Achange to specific mac
ifconfig wlan1 up- by passing mac filtering
- it’s used to allow only specific devices to connect to the network
- note: when mimicking the mac of another user , collision may happen so the best to practice is that the user we are mimicking is currently not connected to the network , or if the access point supports dual band , so we can connect on the
5-GHZas the users are usually connected to the2.4-GHZ
- management frames - De authentication attack
- mac address changing
- DOS (Deauthnetication included)- Flooding
- Frame Flooding - De authentication
- here with one frame i can use one frame and send it many times , and this will cause flooding in the channel and denial of service.
image
image
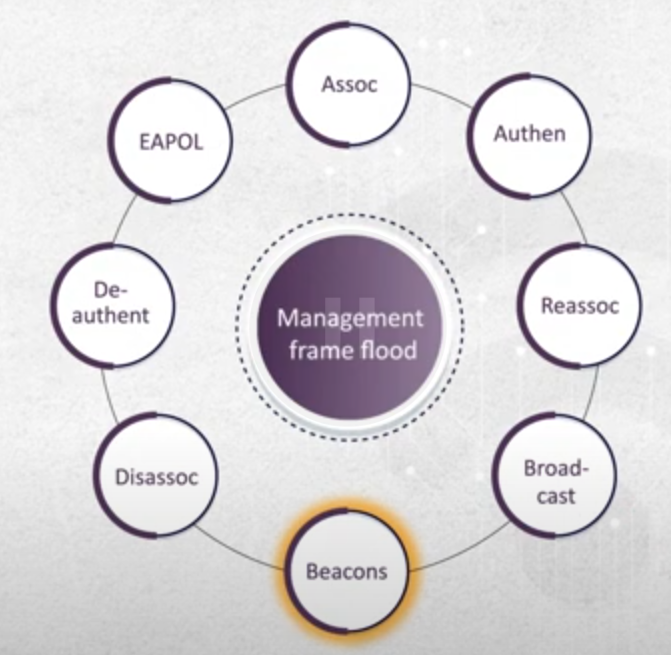
- Types of Frames & Their Attacks
- management frames - De authentication attack
- it’s used to manage the network
image

- these frames are sent in plain text.
- Attack :
- here we can remove a user from the network by sending deauthentication frame
image
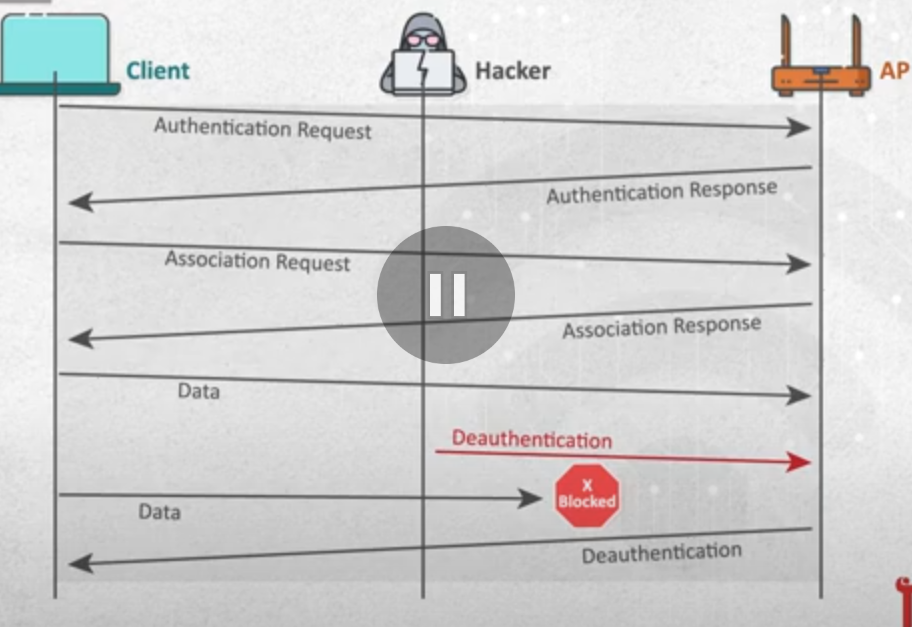
- Detection :
- to detect it we can monitor the network and detect the deauthentication frames in package log.
- prevention: we can use MFP (management frame protection) , it’s a wireless feature the increases the security of the management frames by encrypting it using PSK , problem: that for this method to work the client and access point must support the MFP.
- exploit
- spoofing client’s mac address
- this attack is done by spoofing the mac address and send deauthentication frame to the access point.
aireplay-ng --deauth 10000(nubmer of messages) -a 58:BA:D4:8C:41:10 mac_address_access_point -c 70:a6:cc:dc:0c:49(client mac address) wlan1(interface)- another command
1
  sudo aireplay-ng -0 5 -a 00:14:6C:7A:41:81 -c 00:0F:B5:32:31:31 wlan0mon
0means deauthentication5is the number of deauths to send (you can send multiple if you wish);0means send them continuouslya 00:14:6C:7A:41:81is the MAC address of the access pointc 00:0F:B5:32:31:31is the MAC address of the client to deauthenticate; if this is omitted then all clients are deauthenticatedwlan0monis the interface name
- spoofing access point mac address
- here i spoof the mac address of the access point and send reauthentication frame to all users.
- for this we will use
aireplay-ng --deauth 10000(nubmer of messages) -a 58:BA:D4:8C:41:10 mac_address_access_point wlan1(interface)this will deauthenticate all clients from the access point.
- note: while exploiting attack there can be problem with
channelwithaireplay-ngto solve this →iwconfig wlan1(interface) channel 1 (channel number)
- spoofing client’s mac address
- EAPOL
- extensible authentication protocol over LAN.
- this frame is responsible for authentication request and authentication response in wifi.
- now if a used of flood of authentication requests , the access point will DOS as it won’t be able to reply to all requests.
image
- Detection : to detect it we can monitor the network and identify if there is too many EAPOL frames are sent.
- Beacons
- we will use this frame to create many fake access points with no physical existence.
- the problem here that the user will see many fake networks and can’t connect to them as there is no existence for it.
- management frames - De authentication attack
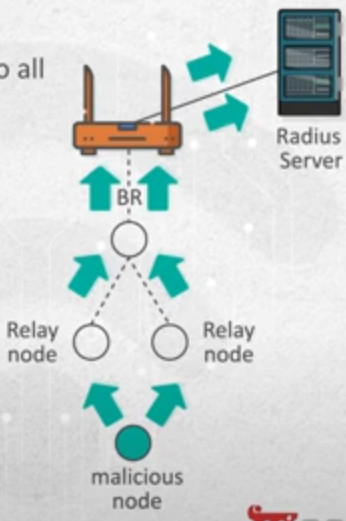
- Exploiting Countermeasures
- here we use countermeasure in the standard (the countermeasure is used to prevent or detect attacks) , against the standard it self .
- MIC Failure Reports
- Exists in TKIP encryption , so it’s in WPA , but unfortunately it’s also valid in WPA2
- now the access point and the user must validate the MIC.
- the counter measure here in the protocol , that if there is 2 MIC failures in the verification , so there is MIC verification failure report that will be sent to the access point and the communication stop for 1 minute, the problem that not all manufacturers apply this countermeasure.
- attack : as an attacker i can get the victim mac address and send to MIC failure to the access point with victim mac address ,and it will be disconnected for one minute , so i can send this frame more than 2 times and the access point won’t let this device to connect.
image - attack example
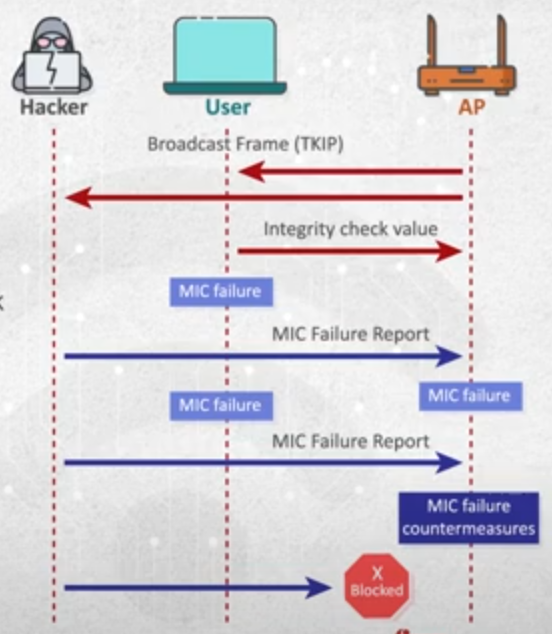
image - affected devices

- detection : the detection for that is hard ,
- Frame Flooding - De authentication
- packet injection
- to test for
packet-injection sudo aireplay-ng --test wlan0mon
- to test for
- password attacking
- to measure the performance
aircrack-ng -S
- to measure the performance
- RF & jamming
- RF Traffic management
- we the RF traffic can be DSSS , OFDM , ERP,,,,,,
- now there is must be a fairly usage of the channel between users , for this we use
DCFdistributed coordination function .image
- from the above image
- IFS : interframe spaces , it’s the time exists between transmissions of wireless frames.
- there is 6 types.
- IFS : interframe spaces , it’s the time exists between transmissions of wireless frames.
- jamming
- it’s different from DOS attacks as it’s not just a frames re transmitted many times , in jamming it’s a bit customizable.
- unfair channel usage
- here we can reduce the back-off time , so i can send over the channel without acknowledgement.
- here i will occupy the channel , and modify the standards so this will block other users from using the channel.
- decrease
AIFS , SIFS - NOTE : this attacks is hard to be applied , as it requires the NIC(network interface card) to be modified , and the firmware to be modified.
- detection : to detect it , you will find that there is a client with high throughput compared to other clients so it’s easy to detect it.
- Continues jamming
- here we will stop other user’s connections.
- Attack :
- to do this we have to disable carrier sense.
- disable back-off so we won’t wait any other client to finish.
- prevent the chip from waiting for ACK from the Access point, so we will use the channel with no limits.
- create a QUEUE of large number of frames for transmission , without waiting for acknowledgment.
image

- this attack won’t let anyone connect to the network.
- it’s invisible jammer , as it doesn’t wait for the acknowledgement the monitoring can’t detect it , as to monitor some thing it has to be acknowledged.
- detect
- selective jamming
- RF Traffic management
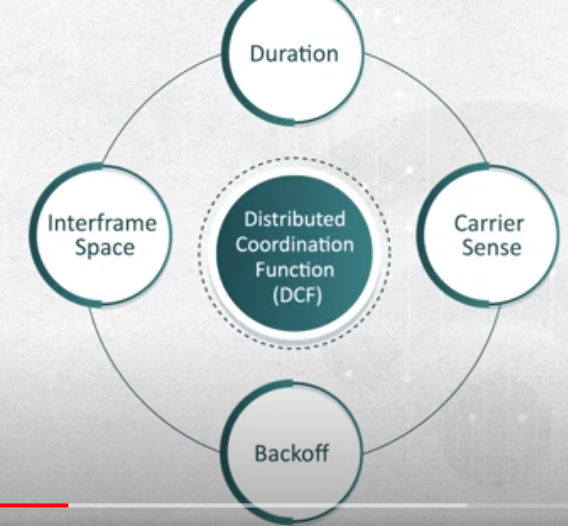
- Probe Request Attack
- it’s information gathering attack.
- now the client has list off ssid that the client connected to before.
- after opening wifi on phone , the phone will search for saves SSIDs , not the access point that will send the ssid and the client connect ,we are not here in network discovery mode.
- the phone here will send probe request with ssid of saved networks.
- then if the ssid exists around , the access point will that name will reply.
- why? why using this method , as it makes the operation faster as we don’t have to wait for the access point to send beacon frame.
- problem : all saved networks on my device will be leaked (ssid , mac address ……)
probe request image

- note: also hidden network is shown in probe requests .
- Hand shake attacks
- dictionary attack
- the target is to get the passphrase of this network
- now from 4 way hand shake the MIC is sent on the channel .
- so we can intercept it and crack it.
- from this we can get PSK (pre shared key)
- the PSK is generated from the passphrase &
ssid - we have the ssid as it’s the name of the network , but for passphrase we will do dictionary attack with list of passwords.
- now as we communicate with the access point , so it will send to use the
anonce,and we have thesnonceas it’s captured also with the MIC as both are sent by the client during authentication process. - after capturing the snonce and MIC , we will brute force the passphrase and generate psk then use anonce and snonce to generate the PTK then hash it and compare the hash to the captured MIC until we get valid one.
- note: we can make deauthentication attack to force client to re authenticate.
- client less attack (PMKID attack) - dictionary attack
- some devices (not all) , when entering a network they connected to before they send association request with PMKID (which is a key send in the 4 way hand shake).
- the dangerous here is that there is some devices , when you send association request to , they reply with association response +
PMKID - we can capture the
PMKIDand crack it withhashcat

- KRACK attack
- key re installation attack.
- this attack leads to nonce reuese in WPA2.
- it’s caused by that some encryption methods after generating some keys , these keys can be used (installed) again.
- i will do MITM on the authentication process , and i will block
ACKfrom reaching the access point. - now after sending the ACK from the client , it will start using the PTK & GTK in communication.
- but the access point didn’t receive the ACK , so it will send Message 3 again .
- then the client will send the
ACKagain , and this message is encrypted.(using different nonce from the first ack) - now as we send second ACK the nonce is reset and the PTK & GTK are reused.
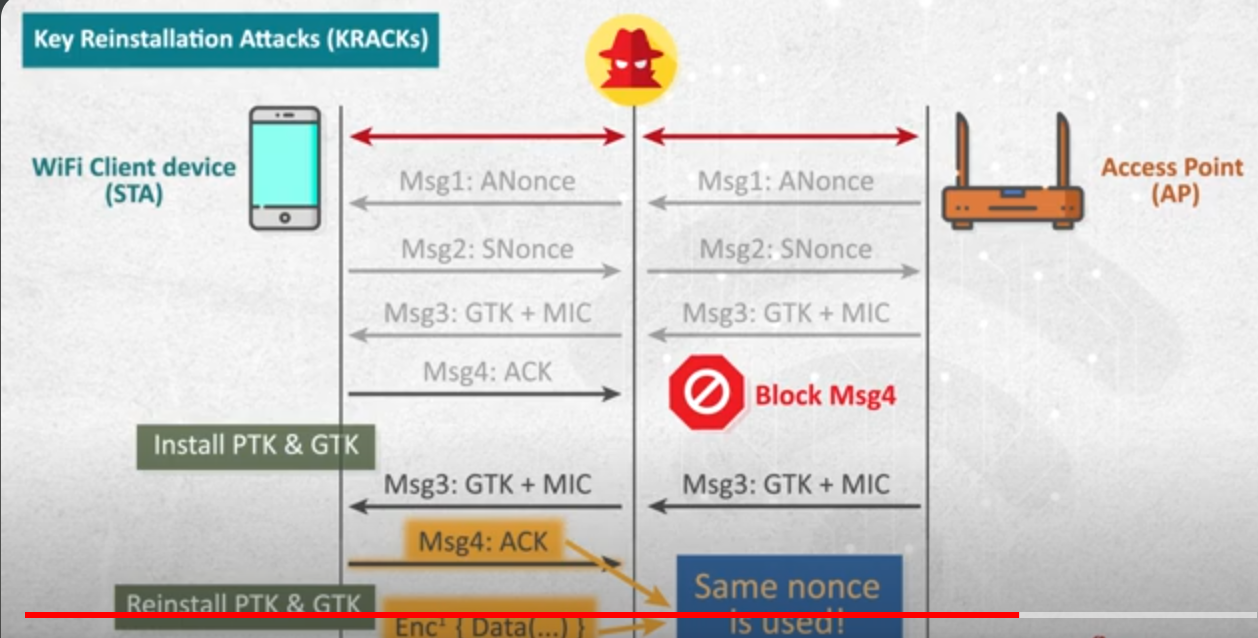
- after that the PTK & GTK will be reinstalled and used again the communication process to encrypt data.
- which means that keys are used twice .

- from the above image , if i did xor from the 2 ACK messages(as they have different nonce) i will got key stream , and i do xor with data i will decrypt it.
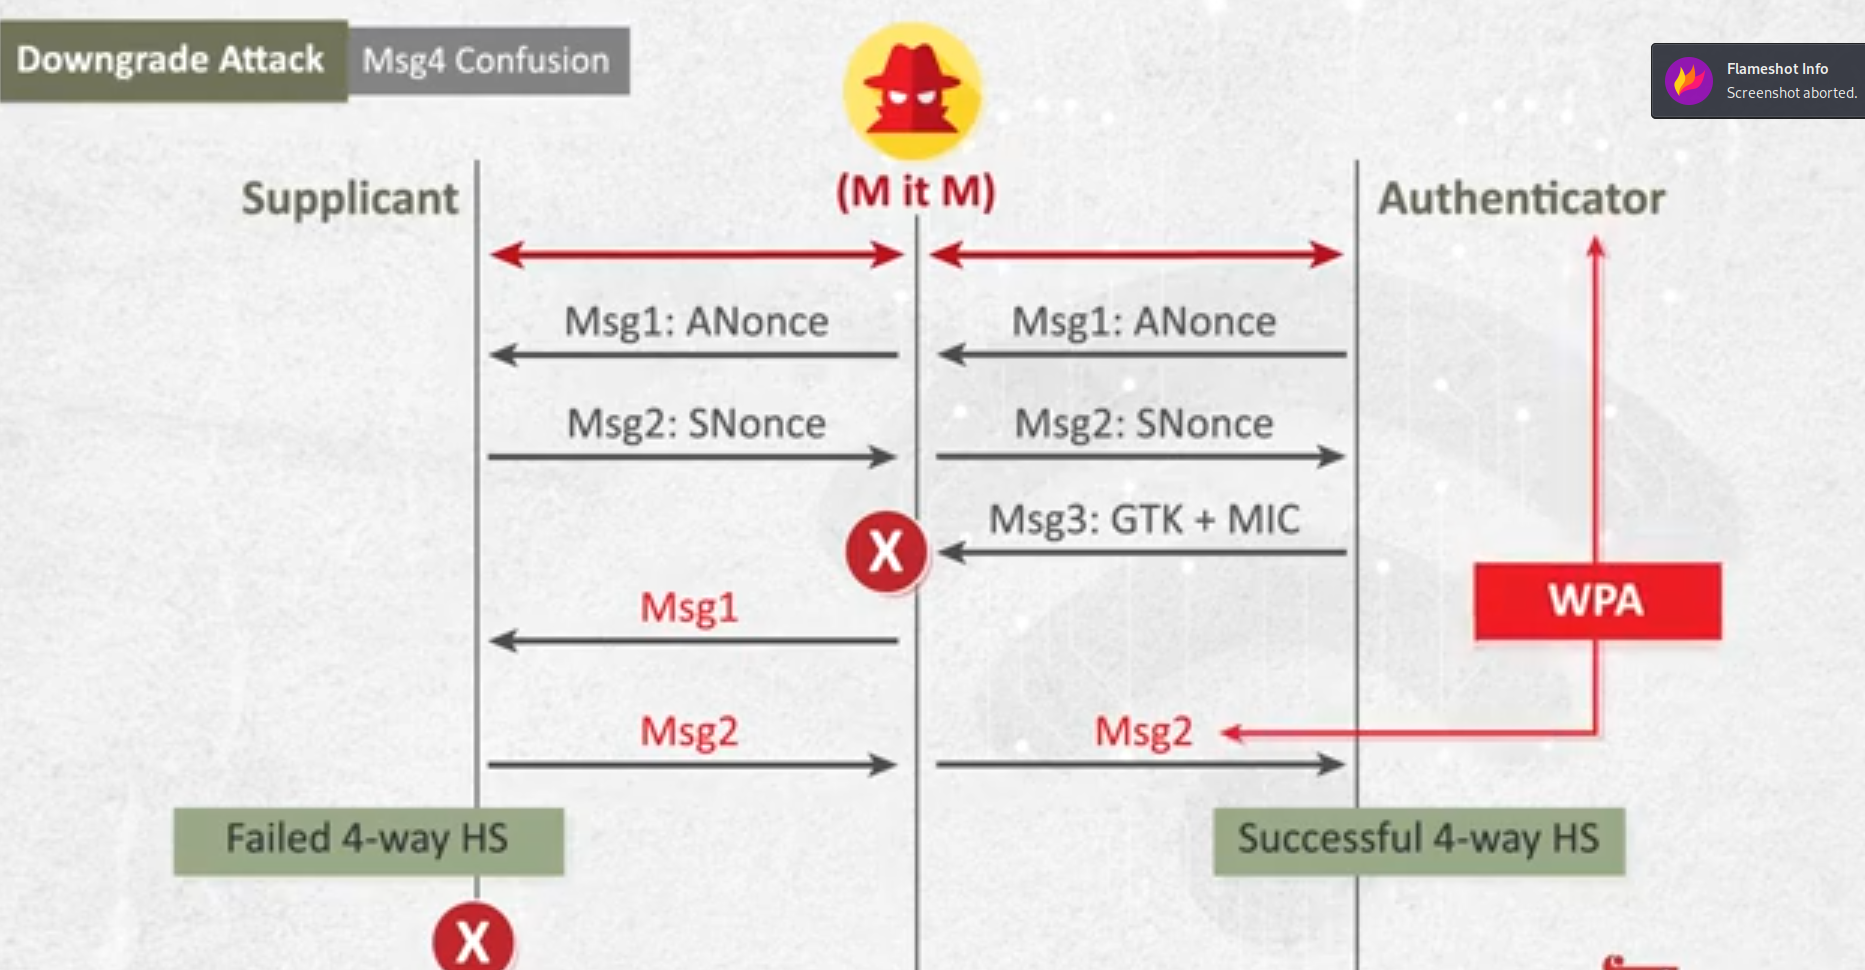
- down grade attack (message confusion)
- target: in this attack we downgrade from wpa2 to wpa , this downgrade the network.
- the ACK message is protected with MIC.
- in this if we do MITM and manipulated the handshake process .
- in the ACK message we send TKIP so we downgrade from WPA2 to WPA.
- dictionary attack
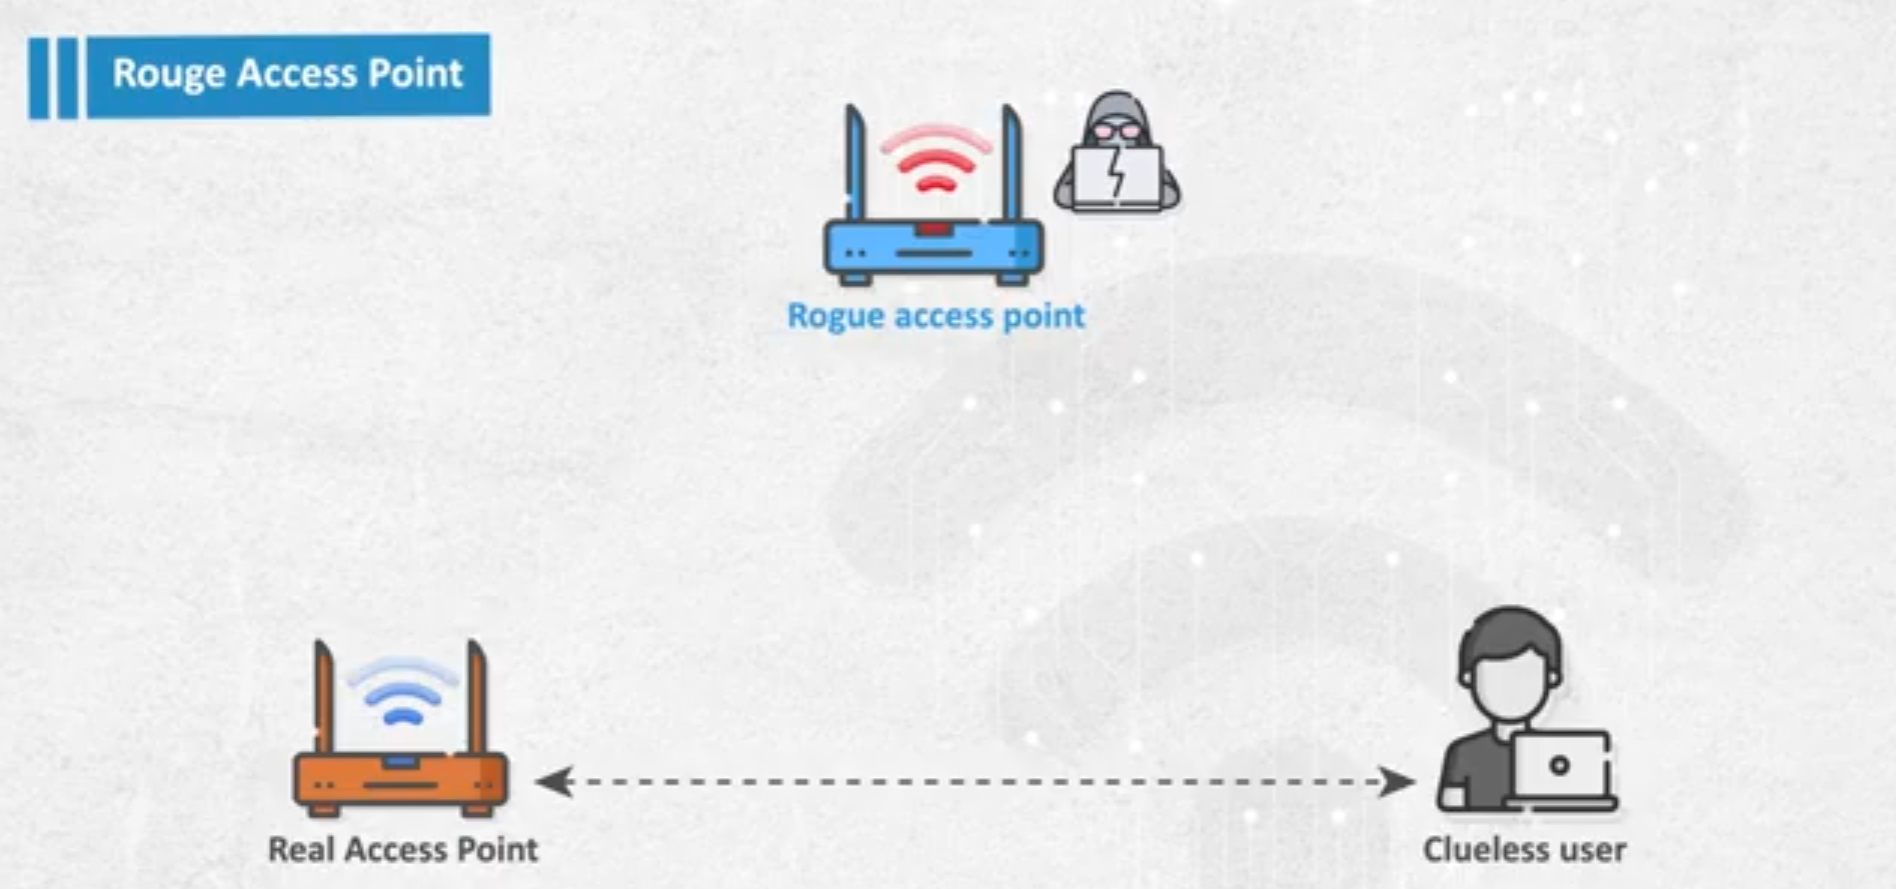
- ROGUE access point (EVIL TWIN)
- about
- if there an access point with weak(or just weaker from the rogue one) signal , and the attacker made rogue access point with stronger signal , so the client will disconnect from the weak one and connect to strong one.
- why ? as the rogue access point is with the same details as the real one (same ssid, password , mac …..)
- Happens: this attack happens due to that wifi marks network from ssid and bssid only.
- Hybrid attack: to do this and force the client to connect to you is by de authenticate the user from the access point and then as your network is stronger it will connect to you , as post exploitation i can be MITM
- Post Exploitation: like forwarding traffic to fake pages….
- the aim of the attack is to disconnect the the client from the reel access point and connect to the rogue one , here we can force user to send it’s data by making fake login page ……
evil-twin:here we simulate real access point and the client is connected to internet, but the difference here is that the client data is monitored by the attacker.(MITM : man in the middle)

- attack model
- devices send probe request with the essid of saved access points .Probe Request Attack
- the attacker will listen and impersonate one with the same essid and configuration.

- for
evil-twinwe have to use 2 network interfaces to redirect the user to the internet . - here we will make packet forwarding from the evil access point to the connected NIC to the internet.
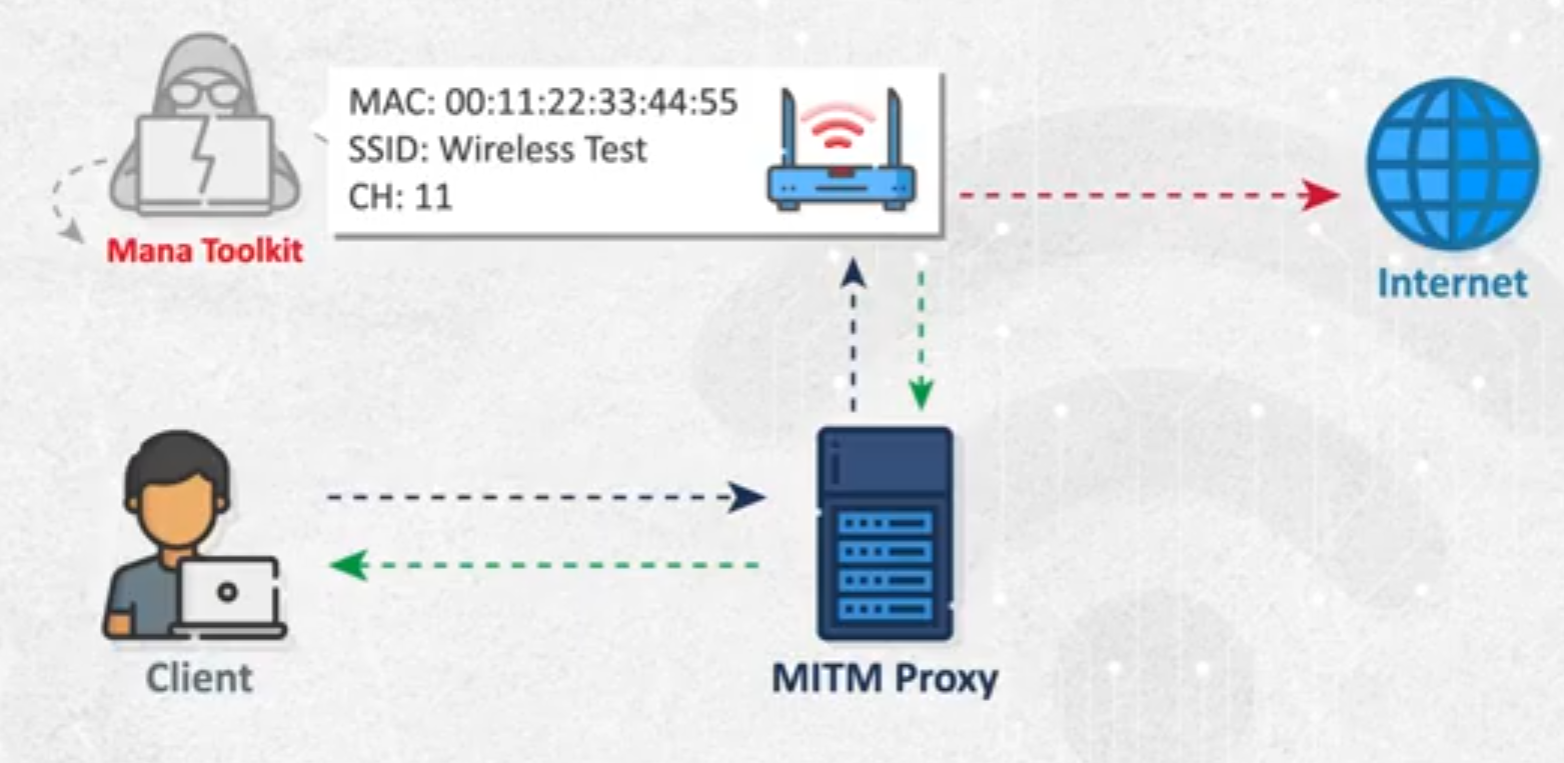
- tools & usage
mana toolkit- at first we will use
mana toolkitto configure our fake access point . - our fake access point will send to the internet through other NIC.
- i will make man in the middle proxy to sniff the packets.
- note:i think that the graph is wrong as the access point is the first that the client connects to and then the traffic goes through the proxy.
- operation: client → proxy → access point → internet.
- at first we will use
- note: to download it follow here → https://youtu.be/YfvOzcvEKfU?si=ZNR42os2R5y6qsAm
- about
- fake access point
- Reading Data
- we will use
airdecap-ng- about
- here how to read data after getting the key to decrypt the traffic
- it also makes the content readable and removing unnecessary wireless protocol information.
- we can use it for
- Removing wireless headers from an open network capture (Unencrypted capture).
- Decrypting a WEP-encrypted capture file using a hexadecimal WEP key.
- Decrypting a WPA/WPA2-encrypted capture file using the passphrase.
options
|
-l| don’t remove the 802.11 header | | — | — | |-b| access point MAC address filter | |-k| WPA/WPA2 Pairwise Master Key in hex | |-e| target network ascii identifier | |-p| target network WPA/WPA2 passphrase | |-w| target network WEP key in hexadecimal |- to remove wireless headers
1
  sudo airdecap-ng -b 00:14:6C:7A:41:81 opencapture.cap
- to Decrypt WEP-encrypted
1
2
  airdecap-ng -w <WEP-key> <capture-file>
  sudo airdecap-ng -w 1234567890ABCDEF HTB-01.cap
- to decrypt wpa-encrypted
1
2
  airdecap-ng -p <passphrase> <capture-file> -e <essid>
  sudo airdecap-ng -p 'Password123!!!!!!' HTB-01.cap -e "CyberNet-Secure"
- about
- we will use
- Tracking
- you can track based on the the signal power
- ESP 8266
- https://github.com/adamff-dev/ESP8266-Captive-Portal.git
- https://github.com/SpacehuhnTech/esp8266_deauther.git
- wifi adapter
This post is licensed under CC BY 4.0 by the author.